Access Control
The access control module gives the ability to give attribute-based permissions to data stored in the components. Based on the authenticated user, the owner of a data object can define a general policy of either allowing or denying everyone along with exceptions to this general policy. These exceptions are defined using user attributes. Currenlty the only attributes supported are:
- User email - String matching on the user's email (Sometimes depending on the customisation available)
- Continent - String matching on the user's organisation continent (if the user belongs to an organisation and if the feature of organisations is enabled)
- Country - String matching on the user's organisation country (if the user belongs to an organisation and if the feature of organisations is enabled)
- Organisation type - Equals/not equals to a specific organisation type (if the user belongs to an organisation and if the feature of organisations is enabled)
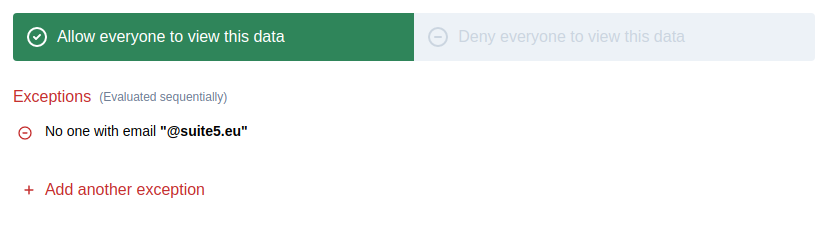
How this works is that access policies always need to have a general policy, either Allow all or Deny all. Beyond that we can choose to have one or more exceptions to this general policy based on the attributes of the logged in user. So for example we can have these kind of rules:
- Allow all
- Deny all
- Allow all except users with email ending in '@suite5.eu'
- Deny all except users with organisation of type 'academic'
- Deny all except users with organisation of type 'academic' and email ending in '@suite5.eu'
Access Control component
To allow the user to view and configure access policies via the component you need to first include access policies on the resource you are retrieving the data from. Including the <access-policy /> component will a readonly or editable view of the access policies. The available configurations are:
- identifier *: This is a mandatory field and is the unique id of this object (normally the id of the object)
- policies *: Also mandatory, a list of the objects policies as retrieved from the object when adding them to the response.
- readonly: This option is optional and default to true. If true then the component is in readonly mode otherwise the user can edit the policies.
Showing access policies

To show the access policies of an object you can use the access-control component as follows
<access-policy
    :identifier="myobject.id"
    :policies="myobject.policies"
    :readonly="true"
/>
Add/Update access policies
To allow for editing of the access policies of an object you can use the access-control component as follows
<access-policy
    :identifier="myobject.id"
    :policies="myobject.policies"
    :readonly="true"
    v-model="accessPolicies"
/>
The accessPolicies variable will contain the updated policies from the component and can be used to in turn store the access policies. To adapt the backend resource to update access policies you need to configure it manually
Including access policies on protected object
When retrieving an object or a list of objects that have access policies we can add to the object properties a list of the access policies by annotating the resource fetching the object or object to use the UseInterceptors annotation with the special access control interceptor AccessControlAppenderInterceptor along with the ACConfig annotation. The ACConfig annotation contains additional information needed by the interceptor to know how and where to place the policies. The ACConfig takes the following configurations:
- objectIdentifier * - This is a mandatory field. This is required to query the access control engine to find the policies for the specific object. This is identifier we gave to the object when we defined the policies. For example for assets it would be
asset - requestType - This is for the type of request we want to check
- objectTable - If the object identifier is the same as the table where this is store then this is not required but if not then this can allow you to specify the specific table this object can be found in
- responseLocation - If the place we will find the object or objects is not in the root of our response, this allows us to define a path in the form of a list of the path parts. For example if it's under 'results.test' then we would pass
["results", "test"]
What the AccessControlAppenderInterceptor will do is on the return of the object to append the access policies of my object in the response. So if I apply it on the example below
    @UseInterceptors(AccessControlAppenderInterceptor)
    @ACConfig({objectIdentifier: 'myobject' })
    async getMyObject(@Param('id') id: number): Promise<MyObject> {
        return await this.myObjectService.getMyObject(id);
    }
If this normally returns
{
    "id": 1,
    "name": "Test"
}
Then with the interceptor it will look like this
{
    "id": 1,
    "name": "Test",
    "policies": [
        {
            "actions": ["Retrieve"],
            "conditions": [
                {
                    "field": "email",
                    "operant": "EQUALS",
                    "value": "@suite5.eu"
                }
            ],
            "effect": false
        },
        {
            "conditions": [],
            "actions": ["Retrieve"],
            "effect": true
        }
    ]
}
Creating/Updating in the backend
The access-control module allows us to create/update/retrieve access policies of objects. In order to create a new policy we need to do the following steps:
1. Create identifying key
First we need to create a key to identify the object we are trying to protect. The getObjectKey function takes in 4 arguments:
- The type of the object (i.e 'asset')
- The id of the object
- The id of the user that created the object
- The id of the user's organisation that created the object (
nullif no organistation)
const objectId = casbinService.getObjectKey('asset', asset.id, asset.createdBy.id, asset.createdBy.organisationId);2. Add/Update general policy
We might want to define just a general policy without any exceptions. To do so we can call the casbinService function updateObjectPolicies with two arguments. The first argument is the object key generated in the step before and the second argument is a boolean. True means Allow all and the false Deny all.
await casbinService.updateObjectPolicies(objectId, false);3. Add/Update general policy with exceptions
To define a general policy with exceptions we again call the casbinService function updateObjectPolicies with two arguments. The first argument is again the object key generated in step 1 and the second argument is a list of policies. Policies are always evaluated in priority. This means that the last policy always needs to be the general policy. Each policy needs to provide the following information:
- actions - The list of actions this policy supports. I.e read, create, update, delete etc. Currently we only support reading which is signified by 'Retrieve'. Available access policy actions can be found here
libs/access-control/src/constants/request-type.constants.ts - effect - Implies whether a condition means that the user has access or not. If the general policy has effect true (meaning 'Allow all') then all the other exception conditions need to be the opposite, meaning that they need to have effect false.
-
conditions - Any conditions that might apply to the policy. This is a list of conditions and all conditions in this list are evaluated with an AND clause between them, meaning that all must apply for this policy to be evaluated to true. Each condition takes the following fields:
- field - The field to check against the current user's attributes (See
src/modules/access-policy/constants/field.tsin the frontend for more information) - operant - The operant to be used to check the value (See
src/modules/access-policy/constants/operant.tsin the frontend for more information and available operants) - value - The value to check
- field - The field to check against the current user's attributes (See
Example
To define this: 'Allow all except users with email ending in '@suite5.eu'' we would need the following access policies to be passed to casbinService.updateObjectPolicies
[
    {
        actions: ['Retrieve'],
        conditions: [
            {
                field: 'email',
                operant: 'EQUALS',
                value: '@suite5.eu',
            },
        ],
        effect: false,
    },
    {
        conditions: [],
        actions: ['Retrieve'],
        effect: true,
    },
];
Protecting a resource with access policies
Access Control Guard
This guard allows you to block access to resources retrieving an "object" related information; meaning resources that take as a parameter the id of the "object" of interest. To apply the access guard we need to use the AccessControlGuard along again with the ACConfig annotations (see above what ACConfig can take). Here are some important points regarding the use and functionality of this guard:
- The guard will check access policies before the controller is executed (compared to the AccessControlFilterInterceptor which runs after the controller code).
- Depending on the current user information, the "object" id and
requestTypeprovided in theACConfigtheAccessControlGuardwill check with the casbin service if the user will receive the data or get a403. - The two requestTypes
CreateandOwnedare currently not checked at all and just pass through. -
Besides checking for the access policies rules the other two reasons the current user might have access to this "object" will be the following
- The current user is the creator of the "object"
- The current user belongs to an organisatition and a user in this organisation has created the "object"
Below you can see an example of how to use the guard on a resource
    @Get(':id')
    @ApiOperation({ summary: 'Retrieve an asset' })
    @UseGuards(AccessControlGuard)
    @ApiForbiddenResponse()
    @ACConfig({ requestType: RequestType.Retrieve, objectIdentifier: 'asset' })
    @UseInterceptors(AccessControlAppenderInterceptor)
    @ToggleFeature(ASSET_METADATA)
    async getAsset(@Param('id') id: number): Promise<Asset> {
        return await this.assetService.getAsset(id);
    }
Access Control Filter Interceptor
To apply access policies we need to use the AccessControlFilterInterceptor along again with the ACConfig annotation (see above what ACConfig can take). Here are some important points regarding the use and functionality of this interceptor:
- Access policies are applied after the controller has fetched and processed the results and just before returning the response to the client
- Depending on the current user information, the "object" id and
requestTypeprovided in theACConfigtheAccessControlFilterInterceptorwill check with the casbin service for which "objects" the user has accesss -
Besides checking for the access policies rules the other two reasons the current user might have access to this "object" will be the following
- The current user is the creator of the "object"
- The current user belongs to an organisatition and a user in this organisation has created the "object"
So for example if we want to filter the results of our resource we would annotate it as follows:
@UseInterceptors(AccessControlFilterInterceptor)
@ACConfig({ responseLocation: ['results'], objectIdentifier: 'myObject', requestType: RequestType.Retrieve })
async search(@Body() configuration: any): Promise<MyObjectResults> {
    return this.searchService.search(configuration);
}
Examples of usage
Right now this is only implemented and applied for asset definition and retrieval.
Access Policies v2 (Product Only)
To address several issues and shortcomings observed in the initial version of access policies, new changes have been introduced for assets and data-checkin pipelines access policies in the Product.
The new access levels for assets (datasets, models and results) are:
- Only me
- Restricted Access (Selected users / departments within the same organisation)
- Organisation-level Access (All users within my organisation)
- Selective Sharing (Private / other organisations)
- Public Access
The new access levels for data check-in pipelines are:
- Only me
- Restricted Access (Selected users / departments within the same organisation)
- Organisation-level Access (All users within my organisation)
On creating a data check-in pipeline, the default level is “Organization-level Access”, but the user will be able to change it. Any eligible user can edit a pipeline or change the access level of the data check-in pipeline and for its involved/resulting asset(s), but without being able to revoke the access of the user that created them. Changing the access level of any asset does not propagate to the pipeline from which it emerged, but the available options may be limited depending on the pipeline's access level (as displayed in the table below).
| Pipeline | Related Assets |
|---|---|
| Data Check-in (Only me) | Dataset (Any access policy) |
| Data Check-in (Restricted Access) | Dataset (Restricted / Organization / Selective Sharing / Public) |
| Data Check-in (Organization-level Access) | Dataset (Organization / Selective Sharing / Public) |
On cloning a data check-in pipeline, the default level is "Only me", but the user will be able to change it. Once a data check-in pipeline is cloned, no asset will be affected since no asset has been cloned from the data check-in pipeline.
New updated exception attributes and operants have been intruduced as below for showing the access policies:
-
For Restricted Access the new exceptions attributes are:
- User email
- User role
- User department role
- Department name
- Department country
-
For Selective Sharing the new exceptions attributes are:
- Organisation legal name
- Organisation business name
- Organisation country
- Organisation continent
- Organisation type
-
Operants for free text inputs are:
- is equal to
- is not equal to
- contains
- does not contain
- starts with
- ends with
-
Operants for dropdown inputs are:
- is equal to
- is not equal to