Core
Core library is a collection of modules that are usually needed when building a new application:
- user: for user management,
- auth: for authenticating users,
- organisation: for organising users in organisations and departments,
- location: for adding structured locations (continents, countries, cities) to entities,
- feature: for dynamic feature toggling
Users
The UserModule is used to bring the full User's functionality to an application. It contains the User entity for defining users, the UserController and UserResolver to be used for adding full CRUD REST and GraphQL queries functionality respectively to an app, as well as the UserService for providing the whole interaction with the database layer.
Additionally, this module contains the UserEvent constant types for the different user actions (Created, Enabled, Disabled, Deleted), and a set of DTOs for creating (CreateUserDTO) and updating (UpdateUserDTO) a user.
To use this module, import it into your app.module.ts:
import { UserModule } from '@suite5/core';

@Module({ imports: [UserModule] })
export class AppModule {
    /* ... */
}
User Roles
- Manager: Responsible for inviting organization’s members to the platform and has a management rights within the organization (see Organisation Manager section below for more details) – note: it should not necessarily be a single individual
- Member: Any user that can access the platform’s functionalities
- Legal Representative: The user who has the legal authority to act on behalf of the organization – note: it should not necessarily be a single individual
- Support Admin: Access Admin Panel and read-access storage for troubleshooting
- Super Admin: Full Access
- Operations Admin: Responsible for approving/enabling/disabling organization/user access in the platform
- Model Moderator: Responsible for managing the underlying data models
User Statuses
- Pending: When a user registers to the platform before creating a verified organisation (no access to the platform)
- Invited: When a user is invited to the platform (no access to the platform)
- Active: Verified user that belongs to a verified organisaiton (access to the platform)
- Suspended: Suspended by an organisation manager or platform's admin (no access to the platform)
- Deleted: A temporal status for users that were deleted. Deleted users are permanlty deleted from the platform within 24hours along with any corresponding data (no access to the platform)
Authentication
AuthModule provides authentication using the Passport.js library. Passport is an authentication middleware for Node. It is designed to serve a singular purpose: authenticate requests. When writing modules, encapsulation is a virtue, so Passport delegates all other functionality to the application. This separation of concerns keeps code clean and maintainable, and makes Passport extremely easy to integrate into an application.
Passport uses what are termed as strategies to authenticate requests. Strategies range from verifying a username and password, delegated authentication using OAuth or federated authentication using OpenID. Before asking Passport to authenticate a request, the strategy (or strategies) used by an application must be configured.
To get started, a couple of strategies are already provided in the authentication module.
Available Strategies
local
The most simple strategy for authenticating users locally (in the application database) using their emails and passwords.
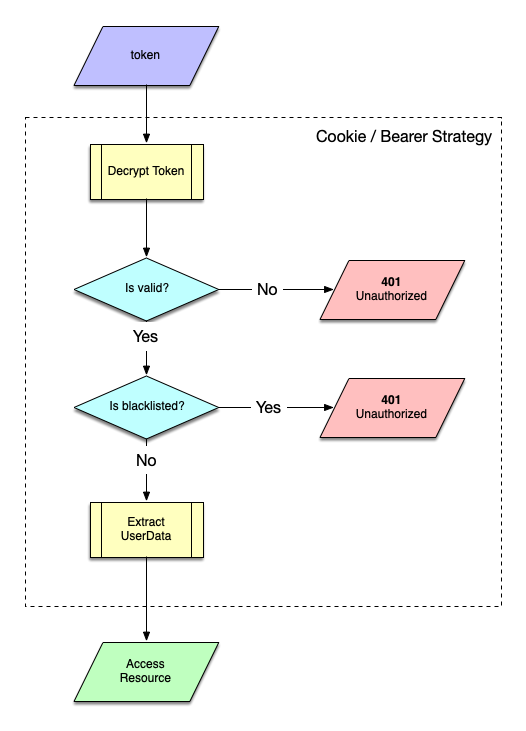
This strategy is used only in the login route, and generates a local Paseto token to be used in subsequent requests. This can be done as using a Cookie and/or an Authorization header (Bearer). What is allowed (cookie, bearer token or both) is user defined in the application configuration.
cookie
If cookie is enabled in the configuration, the login request will return a cookie, to be used by the browser for authenticating requests. This cookie has the HttpOnly and SameSite attributes enabled by default, while Secure can be enabled through a configuration option.
Terminology
- An HttpOnly cookie cannot be accessed by client-side APIs, such as JavaScript. This restriction eliminates the threat of cookie theft via cross-site scripting (XSS). However, the cookie remains vulnerable to cross-site tracing (XST) and cross-site request forgery (XSRF) attacks.
- Attribute SameSite can have a value of
Strict,LaxorNone. With attributeSameSite=Strict, the browsers should only send these cookies with requests originated from the same domain/site as the target domain. This would effectively mitigate cross-site request forgery (XSRF) attacks.SameSite=Laxwould not restrict originating site, but enforce target domain to be the same as cookie domain, effectively blocking third-party (cross-site) cookies. AttributeSameSite=Nonewould allow third-party (cross-site) cookies. - A Secure cookie can only be transmitted over an encrypted connection (i.e. HTTPS). They cannot be transmitted over unencrypted connections (i.e. HTTP). This makes the cookie less likely to be exposed to cookie theft via eavesdropping.
bearer
If bearer is enabled in the configuration, the login request will return a token. Bearer (or token) Authentication is an HTTP authentication scheme that involves security tokens called bearer tokens. The name “Bearer authentication” can be understood as “give access to the bearer of this token”.
The client must send this token in the Authorization header when making requests to protected resources:
Authorization: Bearer <token>token
Users can generate long-lived personal tokens, for accessing specific, secured resources. These tokens have at least one scope attached, allowing a more targeted use and are stored in the database, allowing the user to easily revoke access of a token (delete it).
The client must send this token in a X-API-TOKEN header when making requests to the (appropriate) resources:
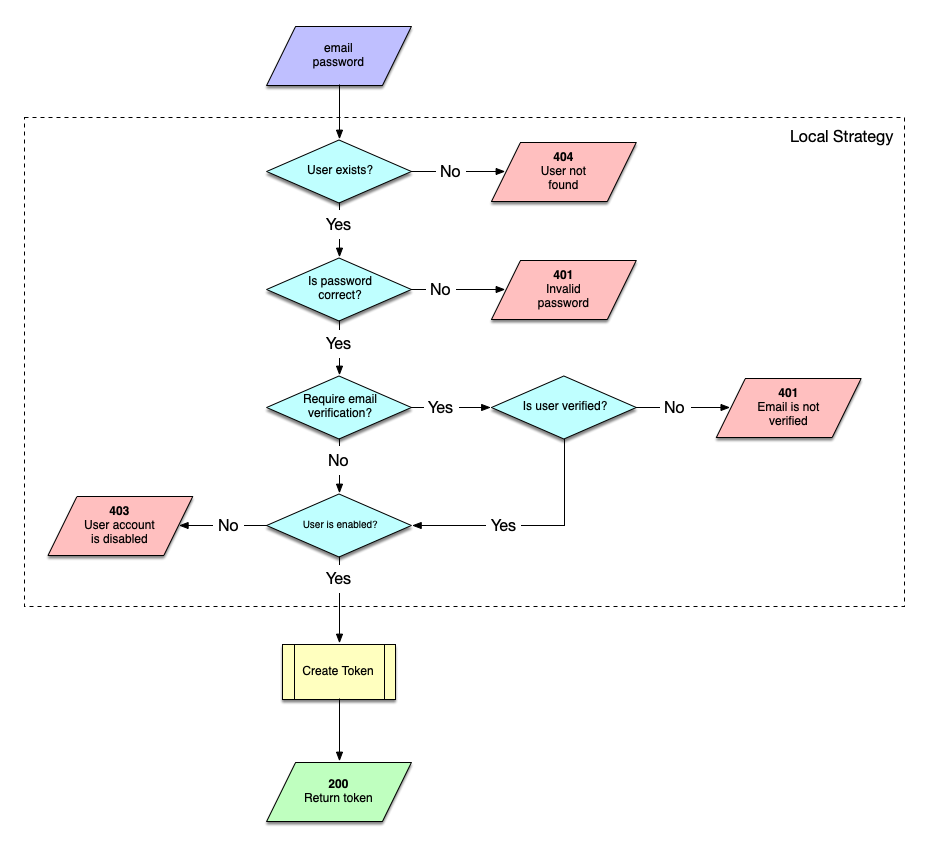
X-API-TOKEN: <token>Login Flow
When the user tries to login, a sequence of checks is executed before a token is returned:
Keycloak Flow
An alternative to logging in from the traditional login page is the Keycloak flow. This allows you to use Keycloak (https://www.keycloak.org/) as an intermediary for registration and login.
How to enable Keycloak authentication
-
Setup the project in keycloak by:
- Creating a realm for your project
- Configure Login/Themes/Email/etc according to your needs
- Under 'Clients' create a new client. Make sure that:
- The access type is 'Public'
- Standard flow is enabled
- Make sure your backend URL is in the Valid Redirect URIs and Web Origins
- Store the keycloak public key (take it from your realm - keys tab - http://[KEYCLOAK_URL]/auth/admin/master/console/#/realms/[REALM_NAME]/keys) under /apps/keys and give the relative path to its location in the .env file of the project
KEYCLOAK_PUBLIC_KEY=../../keys/keycloak.public.key
- Provide a list of keycloak user roles permitted to access the system via keycloak. If none are provided then all users coming via keycloak will have access. The list must be given as a list of comma-separated values in the .env file
KEYCLOAK_PERMITTED_ROLES= Role 1, Role 2,Role3
- Change the frontend use the keycloak login. Examples of this exist in projects BIMERR and CYBELE. In general you need to do the following
- Frontend .env needs to include keycloak information:
  VUE_APP_KEYCLOAK_URL=https://KEYCLOAK_URL
  VUE_APP_KEYCLOAK_REALM=REALM_NAME
VUE_APP_KEYCLOAK_CLIENT_ID=CLIENT_NAME- Install
keycloak-jsversion8.0.0 - For remaining changes please check BIMERR or CYBELE (https://github.com/Suite5/demo-frontend/pull/64/files)
Login flow with Keycloak
- Clicking on the login button or going directly to the login page, the user is redirected to the keycloak login page
- The user logins with their previously created keycloak credentials (or has the option to reset their password or register via Keycloak)
- Once successfully authenticated, keycloak redirects the user back to the component page (redirect given when configuring keycloak). Along with the redirect a JWT token is given.
- If we dedict that call to the frontend happened with this token then we attempt to login the user in our system by calling the resource
/api/auth/keycloakLoginand passing along the token. - In the backend we validate and decode the JWT token using the keycloak public key stored in the path defined in .env variable
KEYCLOAK_PUBLIC_KEY. - If invalid then we reject the authentication.
- If valid we check if there is already an association with keycloak as an external authentication provider. If yes we let the user through. If not we create the association and then let the user through.
- Beyond this point the flow continues as if the user has logged in normally
Note: If a user tries to directly access a protected page while not authenticated they will again be redirected to the keycloak login page and upon login will be redirected to the original page they were trying to access
Registration flow with Keycloak
- Clicking on the register button or going directly to the registration page, the user is redirected to the keycloak register page
- The user registers (or has the option to reset their rpassword or login via Keycloak)
- The user is verified or not based on how Keycloak was configured.
- Once the user has successfully authenticated the flow is the same as of login flow step 3.
Forgot password flow with Keycloak
- For this to work, SMTP needs to be configured on Keycloak configuration.
- Keycloak handles the entire process itself. Eventually when the user logs in then the Login flow does the rest
Logout flow with Keycloak
- Logout user both from our system and keycloak
Logout Flow
The tokens generated by login are not persisted in the database, but as they embed (encoded) information about the user and have an expiration date (they are valid for a limited duration - also a configuration option) they are self sufficient authenticating the user. Having a stateless API, means that the tokens are valid until their end-of-life, making logout meaningless, as the user is responsible for destroying the token.
To make a "true" logout process, when a user tries to logout, the token used for calling the logout resource is added to a list of invalid tokens in Redis, thus blacklisting it. Trying to use that token again for any resource, results to an Unauthorized response.
Hashing
As with every auth library, the user password is stored hashed in the database. In our auth module we use the Argon2 algorithm. Argon2 is a key derivation function that was selected as the winner of the Password Hashing Competition in July 2015. The reference implementation of Argon2 is released under a Creative Commons CC0 license (i.e. public domain) or the Apache License 2.0, and provides three related versions:
- Argon2d maximizes resistance to GPU cracking attacks. It accesses the memory array in a password dependent order, which reduces the possibility of time–memory trade-off (TMTO) attacks, but introduces possible side-channel attacks.
- Argon2i is optimized to resist side-channel attacks. It accesses the memory array in a password independent order.
- Argon2id is a hybrid version. It follows the Argon2i approach for the first half pass over memory and the Argon2d approach for subsequent passes.
All three modes allow specification by three parameters that control:
- execution time
- memory required
- degree of parallelism
To hash a password:
import argon2 from 'argon2';

const hash: string = await argon2.hash(password);Caution: Trying to hash again the password returns different hashes, thus making it impossible to compare two hashed passwords. To verify a password, you need to call the appropriate function.
To verify a password, call the verify function, passing the hashed and the plain text passwords.
import argon2 from 'argon2';

const verified = await argon2.verify(hashedPassword, password);
Authorization
All protected resources have a Authentication Guard, that restrict access to them. This guard uses the configured strategy (cookie and/or bearer) to extract the provided token and check if the resource can be accessed.
This is done by adding a @UseGuards(AuthGuard) decorator above the function (or the controller) retrieving the resource(s). For example:
@UseGuards(AuthGuard)
async retrieveUser(@Param('id') id: number): Promise<User> {}Note:
UseGuardsis imported from@nestjs/common, whileAuthGuardis imported from@suite5/core
Roles
Sometimes we need to limit access to resources and actions to specific user roles. For example, only administrators should be able to deactivate a user's account. To do so, we need to ensure that the resource/action is accessed by an authorized user and that the user has the required role.
This is done in a similar way as above:
@UseGuards(AuthGuard, RolesGuard)
@Roles(ADMIN)
async deactivate(@Param('id') id: number): Promise<void> {}Note:
RolesGuardand theADMINrole is imported from@suite5/core.
The available roles are: ADMIN and MODEL_MODERATOR.
Finally, there are occasions where we want to restrict access everyone but the owner of a resource.
Owner of a resource is considered the user that created it.
Restricting access to the owner is more complicated than the previous cases, as it requires to know not only that a user is authenticated, but WHO is that user. This is easily accomplished by injecting the current user:
async retrieveAsset(
    @CurrentUser() user: UserData,
    @Param('id') id: number,
): Promise<Asset> {}
Now that we have the user, we only need to compare user's id with the id of the user who created an Asset:
if (asset.createdById !== user.id) throw new ForbiddenException();

// Do whatever you want with the retrieved assetNote:
CurrentUserandUserDataare imported from@suite5/core, whileForbiddenExceptionis imported from@nestjs/common.
Access Policies
Sometimes we need to limit access to part of the data being retrieved by a resource. A user might have access to fetch the data but not all the data based on various conditions. To achieve this the access policies mechanism offers attribute based data limitation. Currenlty the only attributes supported are:
- User email - String matching on the user's email (Sometimes depending on the customisation available)
- Continent - String matching on the user's organisation continent (if the user belongs to an organisation and if the feature of organisations is enabled)
- Country - String matching on the user's organisation country (if the user belongs to an organisation and if the feature of organisations is enabled)
- Organisation type - Equals/not equals to a specific organisation type (if the user belongs to an organisation and if the feature of organisations is enabled)
How this works is that access policies always need to have a general policy, either Allow all or Deny all. Beyond that we can choose to have one or more exceptions to this general policy based on the attributes of the logged in user. So for example we can have these kind of rules:
- Allow all
- Deny all
- Allow all except users with email ending in '@suite5.eu'
- Deny all except users with organisation of type 'academic'
- Deny all except users with organisation of type 'academic' and email ending in '@suite5.eu'
See more details of how access control works and how to define, retrieve and apply access policies
Organisations
Overview
The OrganisationModule is used to bring the Organisation's functionality to an application. It contains the Organisation entity for defining organisations, the OrganisationController and OrganisationResolver to be used for adding full CRUD REST and GraphQL queries functionality respectively to an app, as well as the OrganisationService for providing the whole interaction with the database layer. When creating an organisation, its location (will be discussed in the Locations section) must also be provided. An organisation might also contain departments. An organisation can also be enabled/ disabled and verified/ unverified, but only by users with ADMIN role (can also be referred to as administrators).
A set of DTOs for creating (CreateOrganisationDTO) and updating (UpdateOrganisationDTO) an organisation and creating (CreateDepartmentDTO) a department are also included.
@Roles(ADMIN)
async enable(@Param('id') id: number): Promise<Organisation> {}Note: The
ADMINrole is imported from@suite5/core.
In addition to the above, this module contains the Department and DepartmentUser entities for defining departments in an organisation and department users in a department respectively. The DepartmentController allows for retrieving and updating a department or its location and not only adding department users to a department, but also removing and retrieving them. The DepartmentResolver and the DepartmentUserResolver enable GraphQL queries functionality to an app, while the DepartmentService provides the whole interaction with the database layer.
Last but not least, OrganisationType and OrganisationRole entities, which define the type of an organisation and the role of a user in an organisation respectively, are also included in this module. The OrganisationTypeController allows the retrieval of the organisation types, while the creation and the update of an organisation type is only permitted for users with ADMIN role.
@Roles(ADMIN)
async createOrganisationType(@Body() data: CreateOrganisationTypeDTO): Promise<OrganisationType> {}Note: The
ADMINrole is imported from@suite5/core.
Similarly, the same rules apply for retrieving the organisation roles by the OrganisationRoleController and that only an administrator can create or update an organisation role. The OrganisationTypeResolver and the OrganisationRoleResolver enable GraphQL queries functionality to an app, while the OrganisationTypeService and OrganisationRoleService provide the whole interaction with the database layer.
The CreateOrganisationTypeDTO is used in the creation of an organisation type, while the UpdateOrganisationTypeDTO at its update. In the same way, the
CreateOrganisationRoleDTO is used in the creation of an organisation role and the UpdateOrganisationRoleDTO at its update.
To use this module, import it into your app.module.ts:
import { OrganisationModule } from '@suite5/core';

@Module({ imports: [OrganisationModule] })
export class AppModule {
    /* ... */
}
Departments
Organisations can create departments and assign members to them. Departments could facilitate the organisation's operations by enriching access level choices. The OrganisationController provides the tools for creating, retrieving, and deleting departments. At the department's creation, its location must also be provided. The DepartmentController is responsible for retrieving, assigning/removing users, update department, and retrieving/updating department's location. The DepartmentUserResolver and the DepartmentResolver enable GraphQL queries functionality to an app, while the DepartmentService provide the whole interaction with the database layer. There are also DTOs for updating a department (UpdateDepartmentDTO) and creating a department user (CreateDepartmentUserDTO).
Roles
An organisation manager can also add custom roles to organisation's members inside a department.
Organisation Manager
An organisation contains one ore more users with the MANAGER role. An organisation manager has the following special rights and permissions within the organisation:
- Edit organisation details: The manager can modify the organisation's business name, website, description, address, postal code and city.
- Manage department roles: The manager can create, edit and delete department roles within the organisation. These roles can be assign to department members.
- Manage departments: The manager can create, edit and delete departmets in the organisation. Note: after the deletion of a department, all department members will not belong to any department.
- Manage department members: The manager can add and remove organisation members to/from a department.
- Promote member to manager: Giving the
MANAGERrole to a member of the organisation. The specific user will have all manager's permissions and access rights within the organisaiton. - Demote manager to member: Removing the
MANAGERrole from an organisation manager (except the creator (OWNER)). The specific user will lose all manager’s permissions and access rights within the organisation. - Suspend user: Removing (temporarly) the access from the platform for the specific user. A
Suspendeduser cannot login or use any of the platform's functionalities until their account is activated again. - Activate user: Activating a suspender user. The user will be able to use the platform.
-
Delete user: The manager can delete (permanently) an organisation member, Deleting a user, the following steps are take place:
- The user takes the
Deletedstatus - The user is deleted from the Keycloak
-
A
UserEvent.Deletedevent is triggered that is handled in:- Asset Service
- Intergation Providers service
- Job Service
- File Service
- Vault Service
- Runner Service
- Workflow Service
- Those services are responsible to permanently delete user's data from all services: MinIO, MongoDB, Vault, PostgreSQL, ElasticSearch, RabbitMQ, and deprecate all assets and workflows that utilize assets created by the deleted user.
- Every midnight, a cron-job checks if all the data of every deleted user are successfully deleted from all services. If yes, the user is deleted from the database and a notification message is sent to the manager who deleted the specific user.
- The user takes the
Locations
The LocationModule is used to bring the Location's concept and functionality to an application. It contains the Location entity for defining locations and the LocationResolver to be used for GraphQL queries functionality to an app, as well as the LocationService for providing the whole interaction with the database layer.
This module also comes with the Continent, Country and City entities, for defining a continent, a country and a city respectively. The ContinentController allows for retrieving all the continents or the countries of a continent. Users with ADMIN role, are also allowed to create a continent.
    @UseGuards(AuthGuard, RolesGuard)
    @Roles(ADMIN)
async createContinent(@Body() data: CreateContinentDTO): Promise<Continent> {}Note:
RolesGuardand theADMINrole is imported from@suite5/core.
The CountryController enables the retrieval of all the countries or the cities of a country and also the creation of a country to those who have ADMIN role. Furthermore, the CityController, can be used by users with ADMIN role, for creating a city.
ContinentResolver, CountryResolver and CityResolver are also available for GraphQL queries functionality and ContinentService, CountryService and CityService are providing the interactions with the database layer.
Additionally, this module contains a set of DTOs for creating (CreateLocationDTO) and updating (UpdateLocationDTO) a location and also creating a continent (CreateContinentDTO), a country (CreateCountryDTO) and a city (CreateCityDTO).
To use this module, import it into your app.module.ts:
import { LocationModule } from '@suite5/core';

@Module({ imports: [LocationModule] })
export class AppModule {
    /* ... */
}
Features
The features module is responsible for dynamic feature toggling using Unleash. Unleash is a feature toggle system, that gives you a great overview of all feature toggles across all your applications and services. It comes with official client implementations (among others) for Node.js, Go and Python.
Configuration
This module is global, thus you only need to import it in your application module (app.module.ts) to make it available everywhere. Then, you need to set few environmental variables:
UNLEASH_URL = https://features.s5labs.eu
UNLEASH_KEY_FILENAME = /full/path/to/private/key/unleash
UNLEASH_PASSPHRASE =
The UNLEASH_URL above is configured to provide feature toggles for any backend application that provides a valid token. This token is sent with every request, and requires a set of keys (public/private) for signing the requests using PASETO. You can retrieve the keys from Google Drive.
Offline Mode
If, for any reason, the FeatureModule is imported but UNLEASH_URL is not defined, then the module switches to "offline" mode. While in offline mode, all features are considered enabled in development and disabled in production. As this might cause numerous problems, make sure you use the appropriate url/token even when developing locally. Having HOSTNAME set to localhost (default in .env.sample) will allow you to use (almost) any functionality.
Using in a backend application
Restrict access in controller routes
As the feature toggles are (meant to be) dynamic, the appropriate way to use them is through a guard (FeatureGuard) created for this purpose and a decorator (ToggleFeature) that helps you define which toggle is required to be enabled for a controller to be allowed. For example, the following snippet checks that the user is authenticated (AuthGuard) and that the ORGANISATION feature is enabled (*) before creating an organisation.
@Post()
@UseGuards(AuthGuard, FeatureGuard)
@ToggleFeature(ORGANISATION)
async create(@CurrentUser() user: UserData, @Body() data: CreateOrganisationDTO): Promise<Organisation> { /* ... */ }
A feature might be enabled for a user with a predefined username, a specific hostname or enabled/disabled globally for everyone.
In-service toggles
Furthermore, if you want to fine-tune the access in specific features or you have intertwined features (features that call other features in their services/controllers), limiting the access in the controller in general is not enough. In this case, you need to inject a FeatureService in your service/controller, and use its isEnabled function to check if the specific feature is enabled or not:
import { FeatureService, UserData } from '@suite5/core';

export class MyComplexService {
    constructor(private readonly featureService: FeatureService) {}

    async doSomething(user: UserData) {
        if (this.featureService.isEnabled(FEATURE_NAME, { userId: user.username })) {
            // Feature is enabled, go ahead
        }
    }
}
Using in frontend
In frontend the process is different, as we need to block the user from viewing specific part of our application. To make sure that the user has no access to the strategies and the rules defined, we generated an endpoint in the backend to be comsumed by the frontend, retrieving a set of all features along with their status (enabled or not). The idea is that after the user is logged in (or whenever the user refreshes the page), the frontend retrieves this list, stores it in Vuex store and checks wherever needed.
To simplify this even further, we define a isEnabled function globally (i.e. in App.vue) that checks if a feature is enabled, and we provide it for any child components to inject and use it directly.
In App.vue:
const isEnabled = (feature: string) => !!features[feature];
provde('isEnabled', isEnabled);
in a specific page/component:
const isFeatureEnabled = inject('isEnabled');
if (isFeatureEnabled('harvester.kafka')) {
    /* ... */
}
Available Toggles
The list of available toggles (to be updated whenever a new toggle is added to the server) can be found in toggles.constants.ts.